Blog

Follow my blog for some tech how-tos and advice for entrepreneurs.

Single Sign On using Google in ASP MVC 3

23 Feb 2012

With more and more websites around, it gets increasingly hard to keep track of all your individual logins. You would not want to use the same login/password for every site because if only one site gets compromised, your password data might be used to log in to other services.

This is where OpenID comes in. OpenID is an API that is supported by a number of web sites, most importantly Google.

This example shows, how to create a Single Sign On with your Google Account for your ASP MVC 3 application using DotNetOpenAuth. The starting point of the implementation is the MVC example from the DotNetOpenAuth website. I changed it from requiring a submit button as the “Sign in with Google” to a simple get action which simplifies the “Sign in with Google” element to straightforward link.

Here is the implementation:

1. Install the DotNetOpenAuth NuGet package

Install this package from the NuGet repository:

Openauth1

After the package was successfully installed, my application wouldn’t start any more.

Some trial and error revealed that some of the Web.config changes, the package performs, are not working. I had to remove the following sections from the Web.config to get it working again:

<section name="uri" type="System.Configuration.UriSection, System, Version=2.0.0.0, Culture=neutral, PublicKeyToken=b77a5c561934e089" />
<uri>
    <idn enabled="All" />
    <iriParsing enabled="true" />
</uri>

2. The Request

I used a separate action for the OpenID call. Here is the first half:

using DotNetOpenAuth.Messaging;
using DotNetOpenAuth.OpenId.RelyingParty;
using DotNetOpenAuth.OpenId;
using DotNetOpenAuth.OpenId.Extensions.AttributeExchange;
using DotNetOpenAuth.OpenId.Extensions.SimpleRegistration;

public ActionResult LoginOID(string returnUrl)
{
    var openId = new OpenIdRelyingParty();
    IAuthenticationResponse response = openId.GetResponse();

    if (response == null)
    {
        var openid = new OpenIdRelyingParty();
        IAuthenticationRequest request = openid.CreateRequest(
            Identifier.Parse(WellKnownProviders.Google));

        var fr = new FetchRequest();
        fr.Attributes.AddRequired(WellKnownAttributes.Contact.Email);
        fr.Attributes.AddRequired(
            WellKnownAttributes.Contact.Phone.Home);
        fr.Attributes.AddRequired(WellKnownAttributes.Name.First);
        fr.Attributes.AddRequired(WellKnownAttributes.Name.Last);
        request.AddExtension(fr);

        // Require some additional data
        request.AddExtension(new ClaimsRequest
        {
            Email = DemandLevel.Require,
            FullName = DemandLevel.Require,
            Nickname = DemandLevel.Require
        });

        return request.RedirectingResponse.AsActionResult();
    }

Initially, the response object will be null, so the first if block will be executed.

This code creates the authentication request and redirects to Googles login page if necessary. Note, that I’m requesting permission to read some fields from the account. I read these fields later to create a local user profile in my application’s database.

3. The Response

The line

return request.RedirectingResponse.AsActionResult();

takes you to Googles login page and asks you for permission to share the profile fields requested.

Google then calls back at the same URL, it was called from. This means, that the LoginOID Action will be invoked again.

This time, the openId.GetResponse() method will provide the Googles response object, so the else block will be executed:

else // response != null
{
    switch (response.Status)
    {
        case AuthenticationStatus.Authenticated:
            var oid = response.ClaimedIdentifier.ToString();
            var user = MyLoadUserFromDBByOID(oid);

            if (user != null)
            {
                FormsAuthentication.SetAuthCookie(user.UserName, false);
                return RedirectToAction("Index", "Home");
            }

            MyRegisterModel model = new MyRegisterModel();

            var fetch = response.GetExtension<FetchResponse>();
            model.FirstName = fetch.GetAttributeValue(
                WellKnownAttributes.Name.First);
            model.SurName = fetch.GetAttributeValue(
                WellKnownAttributes.Name.Last);
            model.Email = fetch.GetAttributeValue(
                WellKnownAttributes.Contact.Email);
            model.ContactNumber = fetch.GetAttributeValue(
                WellKnownAttributes.Contact.Phone.Home);
            model.UserName = model.Email;

            MyRegisterUser(model);
            FormsAuthentication.SetAuthCookie(model.UserName, false);
            return RedirectToAction("Index", "Home");

        case AuthenticationStatus.Canceled:
            ModelState.AddModelError("loginIdentifier",
                "Login was cancelled at the provider");
            break;
        case AuthenticationStatus.Failed:
            ModelState.AddModelError("loginIdentifier",
                "Login failed using the provided OpenID identifier");
            break;
    }
}

4. Other Providers

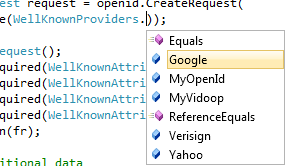
This code works well for a number of other providers, like Yahoo or MyOpenId. The only change is the WellKnownProviders line:
Openauth2

Unfortunately, Facebook and Twitter are not using OpenID. In a future blog post, I’ll look at Single Sign On with Facebook and Twitter.

Waiting spinner for long-running form submits in ASP MVC 3 Razor using jQuery

21 Feb 2012

In the application I’m currently working on, I have a search form, where you can specify a number of parameters, press the search button, and then a few hundred thousand rows in the database are accumulated based on the search request. This takes up to 10s if the cache is not initialised.

Studies have shown [1], that this amount of time can be too long. Users might press the search button again because they’re not sure, anything is happening.

A possible solution (other than optimising my db query) is a waiting animation, like an hour glass or, more modern, a spinner.

First, I tried implementing something using an animated gif as described here [2]. However, I hit a wall with this, because Internet Exporer stops animating gifs after a form has been submitted [3].

I found the final missing piece in one of the answers here [4], which completes it to a workable solution in IE 9 and all other browsers.

Here is a little demo app that shows what we will have at the end of the tutorial:

Let’s look at the code.

1. Create the testing environment

For our testing purposes, a very minimal form will do:

@using (Html.BeginForm())
{
    <div class="editor-label">Search for things</div>
    <div class="editor-field">
        @Html.TextBox("search")
    </div>
    <p>
        <input id="submitbtn" type="submit" value="Search" />
    </p>
}

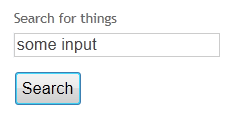
It should look like this:

Spinner Form

The post action has a 5 second wait to simulate some sort of long running action:

[HttpPost]
public ActionResult Index(string search)
{
  Thread.Sleep(5000);
  return View();
}

If you run this now, your browser should we waiting for five seconds after you’ve pressed the search button.

2. The overlay

The waiting spinner is an overlay div, which is css-styled to overlay the entire browser client area. The div is initially invisible and will be switched on using JavaScript later. Here is the CSS for the overlay elements:

<style type="text/css">
    #loading
    {
        display:none;
        position:fixed;
        left:0;
        top:0;
        width:100%;
        height:100%;
        background:rgba(255,255,255,0.8);
        z-index:1000;
    }
  
    #loadingcontent
    {
        display:table;
        position:fixed;
        left:0;
        top:0;
        width:100%;
        height:100%;
    }
  
    #loadingspinner
    {
        display: table-cell;
        vertical-align:middle;
        width: 100%;
        text-align: center;
        font-size:larger;
        padding-top:80px;
    }
</style>

Notice, that the outermost div has an 80% white-transparent background. This will give a nice effect of the side going into a shaded busy-mode.

And the overlay itself (it can be at any place in the view):

<div id="loading">
    <div id="loadingcontent">
        <p id="loadingspinner">
            Searching things...
        </p>
    </div>
</div>

3. Switching to wait mode

The next step is make the div visible when the search button is pressed. This is best done with jQuery like so:

<script type="text/javascript">
    $(function () {
        $("#submitbtn").click(function () {
            $("#loading").fadeIn();
        });
    });
</script>

The fadeIn() function does what it says on the tin and provides a nice transitional effect.

4. Adding an animation

In theory, we’re done. The code so far will white-out the search form and display a message in the middle of the browser window.

But an animation makes the whole thing much nicer, so let’s add one.

A I mentioned in the introduction, an animated gif won’t work, because IE stops all gif animation, once a form is submitted.

Luckily, there is a solution. Download the spin.js script from http://fgnass.github.com/spin.js [6] and add it to your project in the scripts folder. This script displays a waiting spinner using pure JavaScript, no gif animation.

Then, extend out loading script like this:

<script type="text/javascript" 
        src="@Url.Content("~/Scripts/spin.min.js")"></script>
<script type="text/javascript">
    $(function () {
        $("#submitbtn").click(function () {
            $("#loading").fadeIn();
            var opts = {
                lines: 12, // The number of lines to draw
                length: 7, // The length of each line
                width: 4, // The line thickness
                radius: 10, // The radius of the inner circle
                color: '#000', // #rgb or #rrggbb
                speed: 1, // Rounds per second
                trail: 60, // Afterglow percentage
                shadow: false, // Whether to render a shadow
                hwaccel: false // Whether to use hardware acceleration
            };
            var target = document.getElementById('loading');
            var spinner = new Spinner(opts).spin(target);
        });
    });
</script>

This configures the spinner and adds it to our loading div.

5. Result

After pressing the search button, it should look something like this:

Spinner Running

Also, here is a little demo app that shows the finished result:

http://tkglaser.apphb.com/Spinner [7]

All done. When you press the submit button on your form, the whole browser client window should fade to white and the spinner should appear. When the long running operation has finished, a new page will be loaded so the spinner will disappear.

Please leave a comment if find this useful or you have a suggestion.

References:

  1. http://www.useit.com/papers/responsetime.html
  2. http://stackoverflow.com/questions/41162/javascript-spinning-wait-hourglass-type-thing
  3. http://forums.asp.net/t/1475031.aspx/1
  4. http://stackoverflow.com/questions/780560/animated-gif-in-ie-stopping
  5. http://jquery.com/
  6. http://fgnass.github.com/spin.js/
  7. http://tkglaser.apphb.com/Spinner

Phone number validation in MVC 3

14 Feb 2012

If your web application relies on properly entered phone numbers, this might be interesting. This post shows step by step how to use Google’s libphonenumber to validate phone numbers in your MVC 3 application.

Google’s libphonenumber is an open source Java library which is used on Android 4.0 (ICS) mobile phones. There is a C# port of this library which can be made to work with MVC.

This is what you will have at the end of this tutorial: http://tkglaser.apphb.com/PhoneValidation

Here are the steps:

1. Install the NuGet package

In your MVC 3 project in VS2010, just right-click on the projects references folder and choose “Add Library Package Reference…”. Select “Online” and search for the libphonenumber-csharp package and install it.

Nuget

2. Create a Model, a View and a Controller

You know the drill. Let’s start by creating a rudimentary model:

public class DetailsModel
{
  public string Phone { get; set; }
  public string PhoneNumberFormatted { get; set; }
}

We also need a View. Mine is derived from the Create-Template and looks like this:

@model PhoneTest.Models.DetailsModel
@{
  ViewBag.Title = "EnterDetails";
}

<h2>EnterDetails/h2
@using (Html.BeginForm()) {
  @Html.ValidationSummary(true)
  
  <fieldset>
    <legend>DetailsModel</legend> 
    <div class="editor-label">
      @Html.LabelFor(model => model.Phone)
    </div>
    <div class="editor-field">
      @Html.EditorFor(model => model.Phone)
      @Html.ValidationMessageFor(model => model.Phone)
    </div>
    <h2>
      @Html.DisplayFor(model => model.PhoneNumberFormatted)
    </h2>

    <p>
      <input type="submit" value="Create" />
    </p>
  </fieldset>
}

<div>
@Html.ActionLink("Back to List", "Index")
</div>

Notice, that we’ve changed the code around the PhoneNumberFormatted field to be display only. This field is only used for returning the formatted phone number.

Finally, the controller logic:

using PhoneNumbers;

public ActionResult EnterDetails()
{
  return View(new DetailsModel());
}

[HttpPost]
public ActionResult EnterDetails(DetailsModel model)
{
  try
  {
    PhoneNumberUtil phoneUtil = PhoneNumberUtil.GetInstance();
    PhoneNumber n = phoneUtil.Parse(model.Phone, "GB");

    model.PhoneNumberFormatted =
      phoneUtil.Format(n, PhoneNumberFormat.INTERNATIONAL);
  }
  catch (Exception e)
  {
    ModelState.AddModelError("Phone", e.Message);
  }
  return View(model);
}

The interesting part here is the Post method. It uses libphonenumber to parse the entered string assuming a UK country code as default if none is given. Then the number is formatted into the international standard format and returned as string. Any parsing error will throw an exception with a relevant error message which is added to the ModelState dictionary.

3. The fun part

This gives us a nice little toy, we can test the validation with.

I’ve uploaded a little test app to appharbor, so feel free to go there to have a play: http://tkglaser.apphb.com/PhoneValidation

For an invalid phone number, it should look something like this:

Phonefail

A valid phone number should create this output:

Phonesuccess

Notice, how the default country has been added.

That’s it. You can now ensure, that the user is entering a (syntactically) correct phone number.

As always, please leave a comment if you find a mistake or have a suggestion.

Related links:

Google reCAPTCHA in ASP.NET MVC 3 using the Razor engine

1 Feb 2012

After my last post I found that OpenCaptcha.com can be unreliable which leads to the captcha image not being displayed.

So I started looking at Google’s reCAPTCHA. Unlike OpenCaptcha, it needs a local library but in exchange for that you get a really slick looking captcha.

Every guide I found on getting this to work with MVC was outdated or needlessly complicated. So here is the simplest way I could find to add a captcha to the account registration page of your MVC 3 Razor application.

First, go to the reCAPTCHA site and get your own personal public and private key pair.

In your MVC3 application, use the NuGet package manager to install the “reCAPTCHA plugin for .NET” package (Tools->Library Package Manager->Manage NuGet Packages).

Then merge the following settings into your Web.config:

<namespaces>
  <add namespace="Recaptcha" />
</namespaces>

<appsettings>
  <add key="RecaptchaPrivateKey" value="...your private key..." />
  <add key="RecaptchaPublicKey" value="...your public key..." />
</appsettings>

Next, go to your Register.cshtml. Add a reference to the Recaptcha assembly

@using Recaptcha;

and then place the actual reCAPTCHA input field somewhere on your Register view

<div class="editor-label">
  Are you a human?
</div>
<div class="editor-field">
  @Html.Raw(Html.GenerateCaptcha("captcha", "clean"))
  @Html.ValidationMessage("captcha")
</div>

The Html.Raw wrapper is neccessary because otherwise, Razor would escape the HTML tags, which dumps the JavaScript onto your page as text rather than executing it. The “clean” parameter is the theme of the captcha, here are some other themes and customisation options.

Now, your account controller needs code to perform the validation. Add a reference to the Recaptcha assembly in AccountController.cs:

using Recaptcha;

Modify the AccountController.Register method (the [Post] version) as follows:

//
// POST: /Account/Register
[HttpPost, RecaptchaControlMvc.CaptchaValidator]
public ActionResult Register(RegisterModel model, 
  bool captchaValid, string captchaErrorMessage)
{
  if (!captchaValid)
    ModelState.AddModelError("captcha", captchaErrorMessage);

  if (ModelState.IsValid)
  {

It should work now, the Register Method should only succeed when the captcha has been entered correctly. Hope, it helps someone!

Thomas Glaser

@tkglaser
...

About me

Web & Mobile Engineer, Founder, Lean Startup Enthusiast.

tk glaser consulting

Social Links