Blog

Follow my blog for some tech how-tos and advice for entrepreneurs.

A Simple Twitter Feed in MVC 4 Using The RESTful Twitter API

7 Dec 2012

If you want to include a Twitter feed into your web site, one option is to use the standard Twitter widget, which looks something like this:

TwitterWidget.png

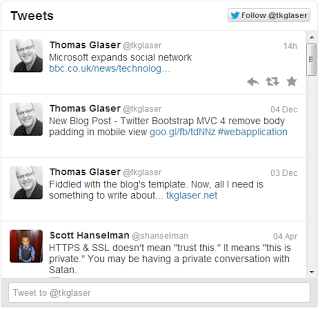
In many cases, this will be good enough. But you might want to embed your Twitter messages more organically into your page so it fits in with the overall look and feel. In that case, you would want to call the Twitter API and display the tweets yourself. This little tutorial shows, how to do exactly that in ASP MVC 4. Here is a demo app that shows the finished result:

tkglaser.apphb.com/TwitterFeed

1. The Model

As always in MVC, it starts with the model. The model reflects the Twitter API model for a tweet, which is not as straightforward as one might think.

Note: I am using the Twitter 1.0 API although it is deprecated. This is because you don’t need an API key and I was too lazy to get one for API 1.1.

Here is my C# model for a tweet. It only contains the fields I’m interested in for this particular demo.

public class User
{
  public string profile_image_url { get; set; }
}

public class Url
{
  public string url { get; set; }
  public string expanded_url { get; set; }
  public string display_url { get; set; }
}

public class Entity
{
  public List<Url> urls { get; set; }
}

public class Tweet
{
  public string created_at { get; set; }
  public string text { get; set; }
  public User user { get; set; }
  public List<Entity> entities { get; set; }
}

public class LandingModel
{
  public List<Tweet> Tweets { get; set; }
}

2. The Controller

Next is the code to call the Twitter API. To do this, I’ve installed the RestSharp nuget package into my project.

RestClient client = new RestClient("http://api.twitter.com/1");
JsonDeserializer jsonDeserializer = new JsonDeserializer();
var model = new LandingModel();

var request = new RestRequest(Method.GET);

request.Resource = "statuses/user_timeline.json";

request.Parameters.Add(new Parameter() { 
  Name = "screen_name", 
  Value = "tkglaser", 
  Type = ParameterType.GetOrPost });

request.Parameters.Add(new Parameter() { 
  Name = "count", 
  Value = 10, 
  Type = ParameterType.GetOrPost });

request.Parameters.Add(new Parameter() { 
  Name = "include_rts", 
  Value = true, 
  Type = ParameterType.GetOrPost });

request.Parameters.Add(new Parameter() { 
  Name = "include_entities", 
  Value = true, 
  Type = ParameterType.GetOrPost });

var response = client.Execute(request);

model.Tweets =
  jsonDeserializer.Deserialize<List<Tweet>>(response);

Most parameters are probably self-explanatory. The include_entities one is important for expanding shortened links in tweets, but I’ll get to that.

3. The View

Now that you have the data, you can render and format it any way you like. For instance like this:

<h1>My Latest Tweets</h1>
<ul>
  @foreach (var tweet in Model.Tweets)
  {
    <li>
      <img src="@tweet.user.profile_image_url" />
      @tweet.text
    </li>
  }
</ul>

This should compile and work. There is just one little thing, links in the text are not links:

  • Microsoft expands social network http://t.co/AhMIaE6D

This is where the url entities come in. If you expand the tweet model like this:

public class Tweet
{
  public string created_at { get; set; }
  public string text { get; set; }
  public string GetTextWithLinks()
  {
    var result = text;

    foreach (var entity in entities)
    {
      foreach (var url in entity.urls)
      {
        result = result.Replace(
          url.url,
          string.Format("<a href='{0}'>{1}</a>",
            url.expanded_url,
            url.display_url));
      }
    }

    return result;
  }
  public User user { get; set; }
  public List<Entity> entities { get; set; }
}

Then, slightly adapt the view:

<li>
  <img src="@tweet.user.profile_image_url" />
  @Html.Raw(tweet.GetTextWithLinks())
</li>

The tweet should now look like this:

  • Microsoft expands social network bbc.co.uk/news/technolog…

That’s it, you can now style and embed your Twitter feed in any way you like. It should look something like this:

tkglaser.apphb.com/TwitterFeed

As always, please leave a comment if you found this useful or have improvement suggestions.

Twitter Bootstrap MVC 4 remove body padding in mobile view

4 Dec 2012

Just a little pitfall I came across today. If you are using Twitter Bootstrap in ASP MVC 4, you might have the same problem.

The Problem

If viewed in desktop mode, my page looks something like this:

BootStrap1.png

Nothing unusual, there is a top nav bar and it is where is should be. Now, if I resize the browser, the page goes into mobile mode and looks like this:

BootStrap2.png

Suddenly, there is a 60px high white space above the nav bar, which looks very much broken.

To complete the picture, here is the code in the layout:

@Styles.Render("~/Content/bootstrap")
<style>
  body {
    padding-top: 60px;
  }
</style>

The body padding is required because otherwise the top nav bar covers a portion of the body in desktop view.

As you might have guessed by now, the body padding is also the culprit for the ugly white gap in mobile mode.

Bootstrap has a solution for this by providing a separate responsive css file which overrides the body padding in mobile mode. You need to reference the responsive css after your body padding. Unfortunately, the nuget package bundles the two css files together:

BundleTable.Bundles
  .Add(new StyleBundle("~/Content/bootstrap")
  .Include("~/Content/bootstrap.css", 
           "~/Content/bootstrap-responsive.css"));

This means, you can’t call the css files separately using the MVC 4 @Styles.Render() command.

The Solution

This is only one possible solution. If there is a simpler one, please drop me a comment below.

First, rip the bundle apart in BootstrapBundleConfig.cs:

BundleTable.Bundles
  .Add(new StyleBundle("~/Content/bootstrap")
  .Include("~/Content/bootstrap.css"));
BundleTable.Bundles
  .Add(new StyleBundle("~/Content/bootstrap-responsive")
  .Include("~/Content/bootstrap-responsive.css"));

Then change your layout to reference the css files in the correct order:

@Styles.Render("~/Content/bootstrap")
<style>
  body {
    padding-top: 60px;
  }
</style>
@Styles.Render("~/Content/bootstrap-responsive")

That should do the trick, the white padding in mobile mode is gone and the nav bar does not cover a part of the body in desktop mode.

As always, please feel free to leave a comment if you find this useful or have an improved solution.

Star Rating Widget in MVC 3 Razor

29 Mar 2012

I wanted to have a nice star rating widget on my MVC entry form. Something like this:

Rating.png

Orkan’s jQuery UI widget seems to be a good choice. The problem is, it doesn’t quite work on MVC forms, because the scripts insists on creating the hidden input field which holds the rating value as “disabled”.

<input type="hidden" name="Rating" value="3" disabled="disabled">

This is problematic because a disabled field is not posted back with the form which means we can’t get hold of the value. There seems to be an option in the widget to fix this, but it doesn’t quite seem to work in the current version.

However, there is a (slightly blunt) solution to this, which is attaching this piece of JavaScript to the submit button of your form:

$('#mySubmitBtn').click(function () {
  $('input[name="Rating"]').removeAttr('disabled');
});

This removes the disabled attribute immediately before the form is posted. It’s an inelegant dirty hack but it fixed the issue for me.

Maybe there is a better way of fixing Orkan’s rating widget, if so, please let me know.

Single Sign On using Facebook in ASP MVC 3

22 Mar 2012

As promised in one of my last posts, here is a quick how-to for Single Sign On in MVC 3 using DotNetOpenAuth. Let’s dive right in.

1. Install DotNetOpenAuth

First, you need DotNetOpenAuth. The easiest way to to install it via the NuGet package manager.

2. Create your Facebook App

Go to developers.facebook.com to create your very own Facebook Web App. This is a simple registration process and free for everybody. Ensure, you configure your Facebook App thusly:

FacebookAuth01

This is the address, Facebook will accept authentication requests from. Make sure, the port number matches the port, the Visual Studio debug server runs on. Needless to say that you have to change this, when your application moves to its proper URL.

What you also get is an App ID and an App Secret. We will need this later.

3. Client Boiler Plate

Next, you need to create a authentication client. I lifted most of the code for this from the DotNetOpenAuth example code:

public class TokenManager : IClientAuthorizationTracker
{
  public IAuthorizationState GetAuthorizationState(
    Uri callbackUrl, string clientState)
  {
    return new AuthorizationState
    {
      Callback = callbackUrl,
    };
  }
}

public class FacebookClient : WebServerClient
{
  private static readonly 
  AuthorizationServerDescription FacebookDescription 
    = new AuthorizationServerDescription
  {
    TokenEndpoint 
      = new Uri("https://graph.facebook.com/oauth/access_token"),
    AuthorizationEndpoint 
      = new Uri("https://graph.facebook.com/oauth/authorize"),
  };

  /// <summary>
  /// Initializes a new instance of 
  /// the <see cref="FacebookClient"/> class.
  /// </summary>
  public FacebookClient()
    : base(FacebookDescription)
  {
    this.AuthorizationTracker = new TokenManager();
  }
}

[DataContract]
public class FacebookGraph
{
  private static DataContractJsonSerializer jsonSerializer 
    = new DataContractJsonSerializer(typeof(FacebookGraph));

  [DataMember(Name = "id")]
  public long Id { get; set; }

  [DataMember(Name = "name")]
  public string Name { get; set; }

  [DataMember(Name = "first_name")]
  public string FirstName { get; set; }

  [DataMember(Name = "last_name")]
  public string LastName { get; set; }

  [DataMember(Name = "link")]
  public Uri Link { get; set; }

  [DataMember(Name = "birthday")]
  public string Birthday { get; set; }

  [DataMember(Name = "email")]
  public string Email { get; set; }

  public static FacebookGraph Deserialize(string json)
  {
    if (string.IsNullOrEmpty(json))
    {
      throw new ArgumentNullException("json");
    }
    return Deserialize(new MemoryStream(Encoding.UTF8.GetBytes(json)));
  }

  public static FacebookGraph Deserialize(Stream jsonStream)
  {
    if (jsonStream == null)
    {
      throw new ArgumentNullException("jsonStream");
    }
    return (FacebookGraph)jsonSerializer.ReadObject(jsonStream);
  }
}

The FacebookGraph class is probably the most interesting one, as it will hold the user’s data after the successful authentication request. I’ve added an Email property to the example implementation. Getting the user’s email address is something we need to specifically ask permission for in the authentication request.

4. The Authentication Request

First, we need an instance of the client class, we created earlier. This is best done within the scope of our MVC Account Controller:

private static readonly FacebookClient client = new FacebookClient
{
  ClientIdentifier = "<--my client id-->",
  ClientCredentialApplicator = 
    ClientCredentialApplicator
      .PostParameter("<--my client secret-->")
};

You need to fill in the specific IDs of your Facebook Web App here.

The actual authentication request is done in a single MVC action:

public ActionResult LogFace()
{
  IAuthorizationState authorization = client.ProcessUserAuthorization();
  if (authorization == null) 
  {
    // Kick off authorization request
    client.RequestUserAuthorization();
  } 
  else 
  {
    var request = WebRequest.Create(
      "https://graph.facebook.com/me?access_token=" 
      + Uri.EscapeDataString(authorization.AccessToken));
    using (var response = request.GetResponse()) 
    {
      using (var responseStream = response.GetResponseStream()) 
      {
        var graph = FacebookGraph.Deserialize(responseStream);

        string myUserName = graph.Name;
        string myEmail = graph.Email;
        // use the data in the graph object to authorise the user
      }
    }
  }
  return RedirectToAction("Index");
}

After the successful authentication Facebook calls back on the same URL it was called from, so our Action gets invoked again. This time, the authorization object will not be null, so the else-block is executed.

After we have the populated graph object (so called because of the Facebook Graph API), we have everything we need to store the user’s details and authenticate the user against our site.

That’s it, you should now have a working Single Sign On MVC Action to authenticate against Facebook.

Please leave a comment if you find a mistake or have a question. Also, if you find this helpful, feel free to give it a “kick”.

ASP.NET MVC 4 Beta Side By Side - Not Quite

16 Mar 2012

The features of the upcoming ASP MVC 4 are nothing short of amazing. I personally can’t wait to use this. But I promised myself to wait for the final release.

Naturally, I cracked. According to Scott Guthrie, MVC 4 Beta can be installed side-by-side with MVC 3, so I installed it this morning and created some MVC 4 test projects.

After having a play I moved on to the day job, working on our MVC 3 application.

All was well until I deployed the MVC 3 application to the test server.

It crashed. The error message was complaining about System.Web.WebPages.Razor 2.0.0.0 not being present.

After some research, it turned out, that even though I have made no changes to my existing MVC 3 project, the linker had used the System.Web.WebPages.dll from MVC 4.

This makes sense, I suppose, as without additional knowledge, the linker uses the binary with the highest version number.

In my case, this created the potentially deadly situation of an application working perfectly well in my dev environment, but having new missing dependencies on the server. Also, this created a project that was probably using half of MVC 3 and half of MVC 4.

Luckily, uninstalling MVC 4 Beta and rebuilding the MVC 3 app solved the issue. Of course I could have edited the MVC 3 project references to specifically use the dlls of MVC 3. But I needed a clean build and quickly.

So, please learn from my experience and be extra careful with installing MVC 4 Beta when you have MVC 3 production code on the same development box.

Update: It seems, I’m not the only one, having this problem.

Thomas Glaser

@tkglaser
...

About me

Web & Mobile Engineer, Founder, Lean Startup Enthusiast.

tk glaser consulting

Social Links