Single Sign On using Google in ASP MVC 3
 by
by
With more and more websites around, it gets increasingly hard to keep track of all your individual logins. You would not want to use the same login/password for every site because if only one site gets compromised, your password data might be used to log in to other services.
This is where OpenID comes in. OpenID is an API that is supported by a number of web sites, most importantly Google.
This example shows, how to create a Single Sign On with your Google Account for your ASP MVC 3 application using DotNetOpenAuth. The starting point of the implementation is the MVC example from the DotNetOpenAuth website. I changed it from requiring a submit button as the “Sign in with Google” to a simple get action which simplifies the “Sign in with Google” element to straightforward link.
Here is the implementation:
1. Install the DotNetOpenAuth NuGet package
Install this package from the NuGet repository:

After the package was successfully installed, my application wouldn’t start any more.
Some trial and error revealed that some of the Web.config changes, the package performs, are not working. I had to remove the following sections from the Web.config to get it working again:
<section name="uri" type="System.Configuration.UriSection, System, Version=2.0.0.0, Culture=neutral, PublicKeyToken=b77a5c561934e089" />
<uri>
    <idn enabled="All" />
    <iriParsing enabled="true" />
</uri>
2. The Request
I used a separate action for the OpenID call. Here is the first half:
using DotNetOpenAuth.Messaging;
using DotNetOpenAuth.OpenId.RelyingParty;
using DotNetOpenAuth.OpenId;
using DotNetOpenAuth.OpenId.Extensions.AttributeExchange;
using DotNetOpenAuth.OpenId.Extensions.SimpleRegistration;
public ActionResult LoginOID(string returnUrl)
{
var openId = new OpenIdRelyingParty();
IAuthenticationResponse response = openId.GetResponse();
if (response == null)
{
var openid = new OpenIdRelyingParty();
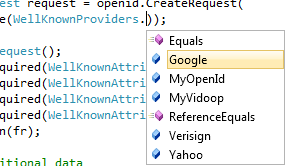
IAuthenticationRequest request = openid.CreateRequest(
Identifier.Parse(WellKnownProviders.Google));
var fr = new FetchRequest();
fr.Attributes.AddRequired(WellKnownAttributes.Contact.Email);
fr.Attributes.AddRequired(
WellKnownAttributes.Contact.Phone.Home);
fr.Attributes.AddRequired(WellKnownAttributes.Name.First);
fr.Attributes.AddRequired(WellKnownAttributes.Name.Last);
request.AddExtension(fr);
// Require some additional data
request.AddExtension(new ClaimsRequest
{
Email = DemandLevel.Require,
FullName = DemandLevel.Require,
Nickname = DemandLevel.Require
});
return request.RedirectingResponse.AsActionResult();
}
Initially, the response object will be null, so the first if block will be executed.
This code creates the authentication request and redirects to Googles login page if necessary. Note, that I’m requesting permission to read some fields from the account. I read these fields later to create a local user profile in my application’s database.
3. The Response
The line
return request.RedirectingResponse.AsActionResult();
takes you to Googles login page and asks you for permission to share the profile fields requested.
Google then calls back at the same URL, it was called from. This means, that the LoginOID Action will be invoked again.
This time, the openId.GetResponse() method will provide the Googles response object, so the else block will be executed:
else // response != null
{
    switch (response.Status)
    {
        case AuthenticationStatus.Authenticated:
            var oid = response.ClaimedIdentifier.ToString();
            var user = MyLoadUserFromDBByOID(oid);

            if (user != null)
            {
                FormsAuthentication.SetAuthCookie(user.UserName, false);
                return RedirectToAction("Index", "Home");
            }

            MyRegisterModel model = new MyRegisterModel();

            var fetch = response.GetExtension<FetchResponse>();
            model.FirstName = fetch.GetAttributeValue(
                WellKnownAttributes.Name.First);
            model.SurName = fetch.GetAttributeValue(
                WellKnownAttributes.Name.Last);
            model.Email = fetch.GetAttributeValue(
                WellKnownAttributes.Contact.Email);
            model.ContactNumber = fetch.GetAttributeValue(
                WellKnownAttributes.Contact.Phone.Home);
            model.UserName = model.Email;

            MyRegisterUser(model);
            FormsAuthentication.SetAuthCookie(model.UserName, false);
            return RedirectToAction("Index", "Home");

        case AuthenticationStatus.Canceled:
            ModelState.AddModelError("loginIdentifier",
                "Login was cancelled at the provider");
            break;
        case AuthenticationStatus.Failed:
            ModelState.AddModelError("loginIdentifier",
                "Login failed using the provided OpenID identifier");
            break;
    }
}
4. Other Providers
This code works well for a number of other providers, like Yahoo or MyOpenId. The only change is the WellKnownProviders line:
Unfortunately, Facebook and Twitter are not using OpenID. In a future blog post, I’ll look at Single Sign On with Facebook and Twitter.