Conway's Game of Life in 3D using HTML 5 canvas and ThreeJS
 by
by
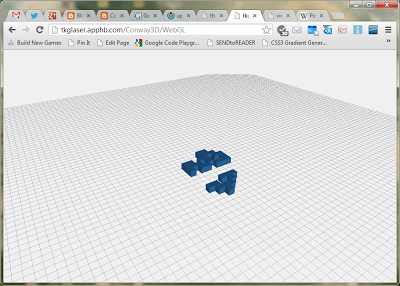
This article looks at implementing Conway’s Game Of Life in 3D in your browser. If you’re not too interested or already familiar with Conway’s Game Of Life, feel free to skip ahead to the 3D section. Here is a screen shot of the finished version:
Or go to the demo page to see it in action.
Conway’s Game Of Life
Conway’s Game Of Life is one of the most fascinating mathematical games I know. It demonstrates, how a simple starting point and simple rules can create a very complex scenario. Also, it is great for demos, as it is fairly easy to implement.
This tutorial demonstrates, how to implement a version of Conway’s Game Of Life using JavaScript and visualise it in 3D using a HTML 5 Canvas and ThreeJS.
ThreeJS is an open source JavaScript library that can be used to render 3D scenes in most HTML 5 compatible browsers. At the end of this tutorial, we will have something like this (select WebGL or Canvas version):
http://tkglaser.apphb.com/Conway3D
Conway’s Game Of Life (CGOL) in JavaScript
As I said above, the implementation of CGOL is manageable even for a JS newbie like me.
First, we need a grid:
var grid;
var gridold;
var gridmax;

function initGrid() {
  gridmax = 100;
  grid = new Array(gridmax);
  for (var i = 0; i < gridmax; i++) {
    grid[i] = new Array(gridmax);
    for (var j = 0; j < gridmax; j++) {
      grid[i][j] = false;
    }
  }
}
This initialises a 2-dimensional array of 100x100 booleans.
Next, we seed the initial fields on the grid. I’m using the F-Pentomino, but feel free to use any shape you like.

function seedLife() {
  var h = gridmax / 2;
  grid[h][h - 1] = true;
  grid[h][h] = true;
  grid[h][h + 1] = true;
  grid[h - 1][h] = true;
  grid[h + 1][h - 1] = true;
}
All that remains is the function, that calculates the next “generation” on the board. The rules are:
- A cell survives if it has 2 or 3 neighbours
- A cell is born if it has 3 neighbours
- Otherwise, a cell dies or remains dead
function stepConway() {
  gridold = grid;
  initGrid();
  for (var i = 1; i < gridmax - 1; i++) {
    for (var j = 1; j < gridmax - 1; j++) {
      var neighbours = 0;

      if (gridold[i - 1][j - 1]) neighbours++;
      if (gridold[i][j - 1]) neighbours++;
      if (gridold[i + 1][j - 1]) neighbours++;

      if (gridold[i - 1][j]) neighbours++;
      if (gridold[i + 1][j]) neighbours++;

      if (gridold[i - 1][j + 1]) neighbours++;
      if (gridold[i][j + 1]) neighbours++;
      if (gridold[i + 1][j + 1]) neighbours++;

      grid[i][j] = (neighbours == 3) ||
        ((neighbours == 2) && gridold[i][j]);
    }
  }
}
Visualisation using Three.js
This is the slightly more difficult step. I wanted to have a 3D view onto a slowly rotating board, where the CGOL “creature” evolves. One way of doing this is using Three.js. This allows us to define a scene in a very general way and leave the rendering to the library. At the end of this, it will look something like this (select the appropriate version for your browser):
http://tkglaser.apphb.com/Conway3D
Initialising three.js and preparing the scene
Let’s start by referencing and initialising three.js:
<script src="~/Scripts/three.min.js"></script>
var container;
var camera, scene, renderer;
var directionallight;
var cubegeometry;
var cubematerial;
var linegeometry;
var linematerial;
var ambientLight;
var lastStep = Date.now();
var mouseX = 0, mouseY = 0;

var windowHalfX = window.innerWidth / 2;
var windowHalfY = window.innerHeight / 2;

function preInit() {
  container = document.createElement('div');
  document.body.appendChild(container);

  camera = new THREE.PerspectiveCamera(
    45, window.innerWidth / window.innerHeight, 10, 5000);

  camera.position.x = 200;
  camera.position.y = 500;
This creates a perspective camera and places it at a point above the grid I am about to create.
  // Grid
  var size = gridmax * 25, step = 50;

  linegeometry = new THREE.Geometry();

  for (var i = -size; i <= size; i += step) {
    linegeometry.vertices.push(new THREE.Vector3(-size, 0, i));
    linegeometry.vertices.push(new THREE.Vector3(size, 0, i));

    linegeometry.vertices.push(new THREE.Vector3(i, 0, -size));
    linegeometry.vertices.push(new THREE.Vector3(i, 0, size));
  }

  linematerial = new THREE.LineBasicMaterial({
    color: 0x000000,
    opacity: 0.2
  });
The grid is a series of horizontal and vertical black lines.
  // Cubes
  cubegeometry = new THREE.CubeGeometry(50, 50, 50);
  cubematerial = new THREE.MeshLambertMaterial({
    color: 0xffffff,
    shading: THREE.FlatShading,
    overdraw: true
  });
Here, a cube is defined. This cube will be the template for all cubes in the scene. The cube itself is white, so the colour it appears in is determined entirely by the light source(s).
  // Lights
  ambientLight = new THREE.AmbientLight(Math.random() * 0x10);
First, some ambient light. This illuminates all cubes evenly and has a random but very dim colour.
  directionalLight = new THREE.DirectionalLight(Math.random() * 0xffffff);
  directionalLight.position.x = Math.random() - 0.5;
  directionalLight.position.y = Math.random() - 0.5;
  directionalLight.position.z = Math.random() - 0.5;
  directionalLight.position.normalize();
A directional light is comparable with sunlight. It arrives at a scene from a specific direction which is equal throughout the scene. Much like a light source that is very far away. The colour of this directional light source is random and so is the initial direction. Now, all that is left to do is to create the renderer. In this example, I’m using a CanvasRenderer, which is the most compatible solution. There are other renderers available but they are less widely supported.
  renderer = new THREE.CanvasRenderer();
  renderer.setSize(window.innerWidth, window.innerHeight);

  container.appendChild(renderer.domElement);

  document.addEventListener(
    'mousemove', onDocumentMouseMove, false);

  window.addEventListener(
    'resize', onWindowResize, false);

}
As you can see, the last snippet registers some event listeners.
function onWindowResize() {
  camera.left = window.innerWidth / -2;
  camera.right = window.innerWidth / 2;
  camera.top = window.innerHeight / 2;
  camera.bottom = window.innerHeight / -2;

  camera.updateProjectionMatrix();

  renderer.setSize(window.innerWidth, window.innerHeight);
}

function onDocumentMouseMove(event) {
  mouseX = (event.clientX - windowHalfX);
  mouseY = (event.clientY - windowHalfY);
}
These event listeners are not very exciting, they simply adjust the camera if the browser window is resized and record the current mouse position.
Let’s get rendering
First we need a function that creates our Three.js scene. A scene is the object passed to the renderer later and contains everything to be rendered.
function buildScene() {
  scene = new THREE.Scene();
  var sceneline = new THREE.Line(linegeometry, linematerial);
  sceneline.type = THREE.LinePieces;
  scene.add(sceneline);
  for (var i = 0; i < gridmax; i++) {
    for (var j = 0; j < gridmax; j++) {
      if (grid[i][j] == true) {
        var cube = new THREE.Mesh(cubegeometry, cubematerial);
        cube.scale.y = 1;

        cube.position.x = i * 50 - gridmax * 25 + 25;
        cube.position.y = 25;
        cube.position.z = j * 50 - gridmax * 25 + 25;

        scene.add(cube);
      }
    }
  }
  scene.add(ambientLight);
  scene.add(directionalLight);
}
This function creates the scene object by bundling up all materials, geometries and light sources we created earlier. Int also iterates through the Conway grid and adds a cube for every living cell at the appropriate position. Now, this scene needs to be rendered.
function render() {
  if (Date.now() - lastStep > 200) {
    lastStep = Date.now();
    buildScene();
    step();
  }
  var timer = Date.now() * 0.00005;

  timer += mouseX * 0.001;

  camera.position.x = Math.cos(timer) * 2000;
  camera.position.z = Math.sin(timer) * 2000;
  camera.position.y += (-mouseY - camera.position.y) * 1 + 1000;
  camera.lookAt(scene.position);

  directionalLight.position.x = camera.position.x;
  directionalLight.position.y = camera.position.y;
  directionalLight.position.z = camera.position.z;
  directionalLight.position.normalize();

  renderer.render(scene, camera);
}
The render function does a number of things.
Firstly, if 200ms have passed, buildScene() and stepConway() are invoked. This moves the conway grid one generation forward and rebuilds the scene.
Secondly, a timer variable is created based on the current time and mouse position. This timer variable is then used to rotate the camera around the centre of the scene. The camera moves on a circle of 2000 units radius around the scene, always looking at the centre. As time moves forward, the camera’s angle changes accordingly.
Thirdly, the directional light source uses the camera’s position as it’s direction. This creates the effect of the light source moving with the camera, so all faces of the cubes are the brightest, when they directly face the camera. The last thing to do is to request an animation frame, so the render function is called continuously.
function animate() {
  requestAnimationFrame(animate);
  render();
}
Done
Now you should have a spinning grid with a Conway life form evolving on it.
If you have any questions, notes, or corrections, please feel free to leave a comment below.