Blog

Follow my blog for some tech how-tos and advice for entrepreneurs.

Syntax highlighting in blogger

13 Mar 2012

Upon special request, a quick post about syntax highlighting in blogger.

I use the google-code-prettify package for this. According to the project page, this library is powering code.google.com and stackoverflow.com. This means, it’s probably good enough for my blog as well.

In order to format the code, you need to take three steps:

1. Mark the code in your post

This is easily done by wrapping your code snippets in:

<pre class="prettyprint">...</pre>

You can also hint the formatter towards the language, the code is in by using

<pre class="prettyprint lang-html">...</pre>

A full list of supported languages can be found here.

2. Run the prettification JavaScript

That part is slightly more complicated. According to Alex Conrad’s blog, the code to invoke google-code-prettify is:

(function() {
    try {
        prettyPrint();
    } catch(e) {
        var scriptId = 'prettyPrinter';
        if (document.getElementById(scriptId) === null) {
            var elem = document.createElement('SCRIPT');
            elem.id = scriptId;
            elem.onload = function() {
                prettyPrint();
            }
            elem.src = "https://google-code-prettify.googlecode.com/svn/trunk/src/prettify.js";
            var theBody = document.getElementsByTagName('body')[0];
            theBody.appendChild(elem);
        }
    }
})();

This script tries to invoke the prettyPrint() method. Initially it will fail as the script google-code-prettify is not yet referenced. In that case, the script adds a dynamic script reference and tries again.

This code needs to be executed on every blog post as the user might come in from a direct post link. So in theory, the script needs to be added to every post. Luckily, Alex has bundled the code, so all you need to do is add this to the bottom of every post:

<script src="https://raw.github.com/gist/1522901/" 
        type="text/javascript">
</script>

Another way is to edit the HTML template of your blog. To do this go to your blog dashboard > Template > Edit HTML > Proceed > [check] Expand Widget Templates and add the code under the tag.

3. CSS

The google-code-prettify library comes with three different themes. Choose one of the themes, copy the CSS content and add it to your blog by going to Template > Customise > Advanced > Add CSS.

Feel free to modify the CSS in any way you like to fit the colours to your blog.

4. Result

It’s a bit more complicated than it should be, but it works. The code in this posting is formatted in the described way, so this is pretty much what you will get. I hope, someone finds this helpful, please let me know what you think.

Multiple where clauses in Linq

9 Mar 2012

This might be common knowledge, some might even consider it trivial, but I just learned this today: you can have as many where clauses in a Linq query as you like.

For example:

from c in db.Customers
where c.County == "Berkshire"
where c.Capacity > 12
where c.Radius < 20
select c

This is valid, compiles and works as expected.

For me coming from classic SQL, this was counter intuitive as SQL only allows one.

Keeping in mind that the Linq syntax is just a chain of individual expressions (filters, projections, …) that are translated into SQL at some point, it makes sense. Linq-to-SQL or the Entity Framework just collects all where clauses and AND’s them together.

I think, the above code looks much cleaner than this:

from c in db.Customers
where c.County == "Berkshire" &&
c.Capacity > 12 &&
c.Radius < 20
select c

It’s a small improvement but I’m happy I discovered this today.

SQL Server Migration from 2008 R2 to 2008

7 Mar 2012

I’ve seen this today:

System.Data.SqlClient.SqlError: The database was backed up on a server running version 10.50.1600. That version is incompatible with this server, which is running version 10.00.2573. Either restore the database on a server that supports the backup, or use a backup that is compatible with this server. (Microsoft.SqlServer.Smo)

I was trying to restore a backup taken from SQL Server 2008 R2 into SQL Server 2008. It seems that the backup files are not backward compatible, which makes sense as the newer server probably has more functionality.

After some googling, I found the workaround: SQL Publishing Wizard. It comes as a standard component and is located at

c:\Program Files (x86)\Microsoft SQL Server\90\Tools\Publishing\1.4\

It generates a script that contains all DDL and SQL statements to create the database from scratch. You have a choice of having the DDL only, SQL only or both.

Saved me a lot of work.

Custom Editor Template for Geo Coordinates in MVC 3 using Google Maps

6 Mar 2012

I was recently given the task to make stored geo location data editable. So ideally I would want to have an Edit view where I can just move a pin around on a map. Something similar has been done in the nerddinner demo application. The developers have of course used Microsoft’s Bing maps. Nothing wrong with that, but I personally prefer Google Maps.

At the end of this tutorial, you will have an Edit / Create View that looks like this:

Location Editor

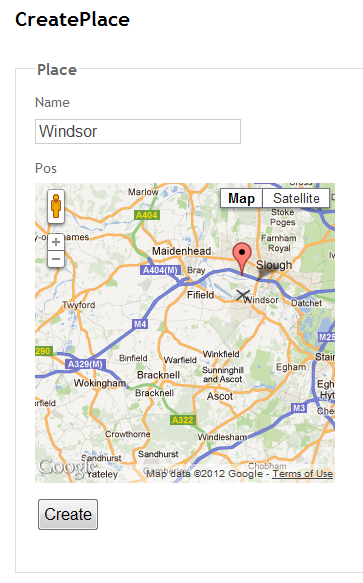
You can move the pin on the map which will update or create the location of the model, once you press the Create button.

Let’s get started.

1. The Model

We want to create a very basic model called Place with a name and a pair of map coordinates.

public class Place
{
    public Place()
    {
        Pos = new GeoCoords() { Latitude = 0, Longitude = 0 };
    }

    public string Name { get; set; }
    public GeoCoords Pos { get; set; }
}

public class GeoCoords
{
    public double Latitude { get; set; }
    public double Longitude { get; set; }
}

It is important, that the GeoCoords are in a separate class. I’ll explain shortly.

2. The View

To create the View, use the standard MVC scaffolding. Unfortunately, the Pos attribute is just omitted because the scaffolder doesn’t know what to do with custom classes. So you need to add the standard edit code for the Pos attribute:

<div class="editor-label">
    @Html.LabelFor(model => model.Pos)
</div>
<div class="editor-field">
    @Html.EditorFor(model => model.Pos)
    @Html.ValidationMessageFor(model => model.Pos)
</div>

This is the same code, MVC would generate for a simple type attribute. This makes for very clean code within the View, as you wouldn’t be able to tell that the Pos attribute needs any special treatment. You’ve probably guessed by now, that we will use a Custom Editor Template. This tells MVC how to render an editor for an attribute of type GeoCoords.

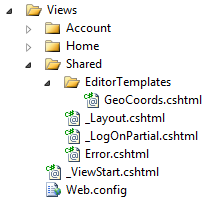
For this, you need to create a new partial View called GeoCoords.cshtml in Views\Shared\EditorTemplates. Create the EditorTemplates folder if it doesn’t exist.

Location Editor Solution Tree

Then edit the code in GeoCoords to look like this:

@model GeoCoordsTest.Models.GeoCoords

@{
    string name = ViewData.TemplateInfo.HtmlFieldPrefix;
    string id = name.Replace(".", "_");
    string lat = id + "_Latitude";
    string lon = id + "_Longitude";
}

@Html.HiddenFor(model => model.Latitude)
@Html.HiddenFor(model => model.Longitude)

<script type="text/javascript" src="https://www.google.com/jsapi?autoload={'modules':[{name:'maps',version:3,other_params:'sensor=false'}]}"></script>

<script type="text/javascript">
    var marker;
    
    function init() {
        var mapDiv = document.getElementById('canvas');
        var map = new google.maps.Map(mapDiv, {
            center: new google.maps.LatLng(
                @Model.Latitude, @Model.Longitude),
            zoom: 8, 
            mapTypeId: google.maps.MapTypeId.ROADMAP
        });
        var pos = new google.maps.LatLng(
            @Model.Latitude, @Model.Longitude);
                
        marker = new google.maps.Marker({
            map: map,
            position: pos,
            title: "",
            draggable: true
        });
                
        google.maps.event.addListener(marker, 'drag', function() {
            var pos = marker.getPosition();
            $("#@lat").val(pos.lat());
            $("#@lon").val(pos.lng());
        });
    }

    google.maps.event.addDomListener(window, 'load', init);    
</script>

<div id="canvas" style="height:300px;width:300px;"></div>

Let’s step through the code. First, two hidden fields are created.

@Html.HiddenFor(model => model.Latitude)
@Html.HiddenFor(model => model.Longitude)

These fields will hold the values of Latitude and Longitude. We will use JavaScript to update the values as the user drags the map pin around. In order to manipulate these hidden fields, we will need to know their ID tag. This part

@{
    string name = ViewData.TemplateInfo.HtmlFieldPrefix;
    string id = name.Replace(".", "_");
    string lat = id + "_Latitude";
    string lon = id + "_Longitude";
}

creates to server-side variables, lat and lon which hold the ID tags of our hidden fields. MVC follows the convention of using the name of the calling model attribute, in our case “Pos” combined with the internal attribute names using an underscore. In our case, this yields “Pos_Latitude” and “Pos_Longitude”. The name of the calling model attribute can be obtained by using ViewData.TemplateInfo.HtmlFieldPrefix. After the Google Maps script reference, the map is created.

<script type="text/javascript">
    var marker;
    
    function init() {
        var mapDiv = document.getElementById('canvas');
        var map = new google.maps.Map(mapDiv, {
            center: new google.maps.LatLng(
                @Model.Latitude, @Model.Longitude),
            zoom: 8, 
            mapTypeId: google.maps.MapTypeId.ROADMAP
        });
        var pos = new google.maps.LatLng(
            @Model.Latitude, @Model.Longitude);
                
        marker = new google.maps.Marker({
            map: map,
            position: pos,
            title: "",
            draggable: true
        });

The map is centered on the given map coordinates. Also, a draggable marker is created. The interesting bit is where the draggable marker is connected to the hidden fields:

google.maps.event.addListener(marker, 'drag', function() {
    var pos = marker.getPosition();
    $("#@lat").val(pos.lat());
    $("#@lon").val(pos.lng());
});

Whenever the marker fires the “drag” event, the hidden fields are identified using jQuery an the server-side variables we created earlier. Then their value is set to the current marker position. This means, that when the user clicks the submit button in the original form, the hidden fields will hold the last value of the draggable marker and will be posted back to the server.

3. The Controller

There is nothing special here. Using the Custom Template will update the model fields allowing the Controller to save the Latitude and Longitude values to the database.

public ActionResult CreatePlace()
{
    return View(new Place());
}

[HttpPost]
public ActionResult CreatePlace(Place model)
{
    if (ModelState.IsValid)
    {
        // save the place
    }
    return View(model);
}

4. Result

You should now have a reusable editor template that displays an embedded Google Map whenever a GeoCoords object is edited in a View.

Simple Tabbed Navigation in MVC 3 using HTML Only

27 Feb 2012

Grouping multiple sites together with a sort of tab folder navigation is a common requirement. Unlike the navigation in the MVC default project template, you want to highlight the current tab to show users where they are.

It would also be nice from a coding perspective if the Views within the tabs are ignorant to the fact that they belong to a tab folder.

It can be done to some extent with jQuery UI Tabs. The disadvantage if this is that you need to load your entire content into a single View page. While this may be fine for a few small pages, a complex tab folder could load for a long time to display things in a tab that the user is not even interested in. Also you need a single Action method that might be long and complicated.

Another way is to have individual Actions and Views and include the tab links within the individual View pages. You could then emphasize the current tab just by hardcoding some CSS class into it.

This is of course very ugly as the whole tab folder code is repeated in every View and introducing a new tab at a later point would mean adding a tab link to every previous View.

Therefore, the tab folder code must go into the layout. If you want to modify your main template or create a specific tab folder layout depends on the individual project.

For this demo, I’ll modify the navigation in the main layout of the standard MVC project template to highlight the current tab. This change needs no modification of an Action or even a View, it’s only in the layout.

This is what you’ll have at the end of this demo:

Tab01

Tab02

It may not be very visually appealing but you can of course tweak this with CSS to your hearts content. Let’s go.

The full code

In your _Layout.cshtml change the nav element to this:

<nav>
    <ul id="menu">
    @{ string action = ViewContext.Controller.ValueProvider
           .GetValue("action").RawValue.ToString(); }
        <li class="@("Index".Equals(action) ? "selected" : "" )">
            @Html.ActionLink("Home", "Index", "Home")
        </li>
        <li class="@("About".Equals(action) ? "selected" : "")">
            @Html.ActionLink("About", "About", "Home")
        </li>
        <li class="@("Third".Equals(action) ? "selected" : "")">
            @Html.ActionLink("A third page", "Third", "Home")
        </li>
    </ul>
</nav>

The first interesting section of this is

@{ string action = ViewContext.Controller.ValueProvider
       .GetValue("action").RawValue.ToString(); }

Here, MVC is queried for the name of the current Action (source). For the standard landing page, it will be “Index”, if the About button is clicked, it will be “About” and so on. You can also query the current controller by passing “controller” instead of “action”.

The second section of interest

<li class="@("About".Equals(action) ? "selected" : "")">

assigns the “selected” CSS class to the currently selected tab. Conveniently, the MVC default project template’s CSS already contains a definition for the “selected” class, so for the purpose of this little demo, no CSS needs to be written.

And that’s all it is. There is a full tabbed navigation, highlighting the current tab and all Views and Actions are unaware that they are in a tab folder.

Thomas Glaser

@tkglaser
...

About me

Web & Mobile Engineer, Founder, Lean Startup Enthusiast.

tk glaser consulting

Social Links